|
Vanguard Banner and Dance Banner/Flags Construction Notes We prefer that banners be handcrafted by Christians so that they can be prayed over and anointed during the construction. But if this is not feasible, you may purchase pre-made banners; then, pray over them and anoint them prior to using them. Any banner, whether handcrafted by a Christian or pre-made, be sure to anoint them with oil and sanctify them to the purposes for which they were designed or purchased BEFORE using them for the first time. When I first started using banners, I looked all around for things that were already pre-made, but I could find nothing that met what God was speaing into my heart. I asked Him to reveal to me why I had to constuct my own banners/flags. Eventually, He did answer through Ray Hughes book, "Sound of Heaven, Symphony of Earth": We have not even touched on the usage of jewels on banners. While we have not felt led to put jewels on banners, many other "banner teams" have. If you feel that you would like to construct banners of your own and bejewel or sequin them, please remember safety of others around you should any of these jewels come "flying" off. Also, please do not sequin around the "free" edges of the banners. If someone should misjudge how far they are from your banner, the sequins could potentially cut them. Suitable Fabrics for Banners:Whenever selecting materials for making a banner, be sensitive to the Holy Spirit and ask Him what He wants you to use.
Poles: We use wooden dowels 3' and 4' long. The minimum size for these should be 3/8"Ř (round). There is quite a bit of force that can be generated when flying banners and you want something that will withstand the torque. You can use wooden beads on the top of the pole and one slid up the pole to the bottom of you banner to keep it from sliding down the handle. If you are making a banner that encases the pole, cut the pole to the length desired and these poles can be any size. You can also use metal poles that were designed for color guard usage. Making the banner:Basic Banner: 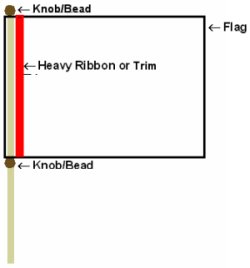
Make your flag any size you want, but you don't want your rectangle to be too long or too short. We will generally use 1 full yard of fabric for 1 flag or for smaller flags they will be 18" x 24". If the flag is too long or too short it will not fly well. Cut out the material for your flag. Fold & sew rolled edges around the flag. A rolled edge is made by just folding the fabric approximately Ľ - 3/8" and then rolling again. Some fabrics may need some encouragement to stay folded applied with an iron and pins. Fold the edge that will be the pole casing approximately 1" - 1-/2" and sew to make a sleeve for the pole.Sew on the heavy ribbon or trim to stabilize the sleeve and prevent it from bunching. If you want the wood pole painted, now would be a good time to do so. Don't forget to paint your beads/knobs. Glue a bead/knob to one end of the pole. You need to use a heavy-duty glue like E6000, which is available in any craft store. Slide the flag/banner onto the pole and slide the 2nd bead onto the pole and to just under the flag/banner and glue. Use a manufactured metal pole designed for band color guard. These can be obtained from places like The Band Shoppe, American Band Accessories Removable flag: You will need a piece of PVC or rigid plastic tubing that has a little bigger I.D.
(inside diameter) than your pole, 3 rubber o-rings that are a tight fit on the pole, and Velcro squares about 1" x 1". Non-Twirling flag: Sew up your flag and only roll the pole casing/sleeve big enough to slide onto your pole. You can either glue the flag to the pole or encase the pole by sewing the ends closed. Piecing together a flag: Want 2 or more different colors or types of fabric in your flag? Then here's the way to join them together. (This works best with right angles but can be made to work with other angles) Half-roll the edge of both piece of fabric where they will be joined and then interlock them and sew. Tip: 
More Info on Banners/Flags: Want more information? Emails us at admin@vanguardbannerdance.org
 Books | Music | Awards | E-mail |
Scottcrew's other websites:
Post your URL on our Free For All Links Page.
|